Pass Situation Passing will cover the following down and distance categories:
- 2nd and 10 +
- 3rd and 3-5
- 3rd and 6-12
- 3rd and 13+
The thing to note here is that while 3rd Downs are obviously important, they are not necessarily a measure of offensive success (Turnovers, Explosive Plays, Scoring Zone TD %, and 1st Down efficiency are all more tangible metrics of a dominant offense). This is because the difference between the BEST 3rd Down team and the WORST 3rd Down team is often negligible -- NO ONE is good on 3RD and 12+. Where an offense can make a difference is in the 3rd and short/3rd and meduim categories. This article is about some simple ideas for making the most of these opportunites. Again, from the first article, our mythical defense is a Cover 2/4 team...
In 2nd and 10+, the main objective is to get HALF THE DISTANCE to the first down; this way, the offense would be back on schedule with a manageable 3rd Down. This is, of course, nothing new. What I would like to offer are some ideas for making the defense play a bit more conservatively than one would think in 2nd and Long from a reaction standpoint.
Many teams dedicated zone teams will revert to their base defense in this situation, or use this as an opportunity to come after the QB via zone blitz. I see the latter as a great opportunity for the offense on 2nd Down because contrary to popular belief, fire zones are intended to make the ball come out fast (not sacking the QB); since the goal is half the yardage; this could be achieved with proper anticipation and planning.
One example of a call to consider would be something like this:
- 2nd and 10 +
- 3rd and 3-5
- 3rd and 6-12
- 3rd and 13+
The thing to note here is that while 3rd Downs are obviously important, they are not necessarily a measure of offensive success (Turnovers, Explosive Plays, Scoring Zone TD %, and 1st Down efficiency are all more tangible metrics of a dominant offense). This is because the difference between the BEST 3rd Down team and the WORST 3rd Down team is often negligible -- NO ONE is good on 3RD and 12+. Where an offense can make a difference is in the 3rd and short/3rd and meduim categories. This article is about some simple ideas for making the most of these opportunites. Again, from the first article, our mythical defense is a Cover 2/4 team...
In 2nd and 10+, the main objective is to get HALF THE DISTANCE to the first down; this way, the offense would be back on schedule with a manageable 3rd Down. This is, of course, nothing new. What I would like to offer are some ideas for making the defense play a bit more conservatively than one would think in 2nd and Long from a reaction standpoint.
Many teams dedicated zone teams will revert to their base defense in this situation, or use this as an opportunity to come after the QB via zone blitz. I see the latter as a great opportunity for the offense on 2nd Down because contrary to popular belief, fire zones are intended to make the ball come out fast (not sacking the QB); since the goal is half the yardage; this could be achieved with proper anticipation and planning.
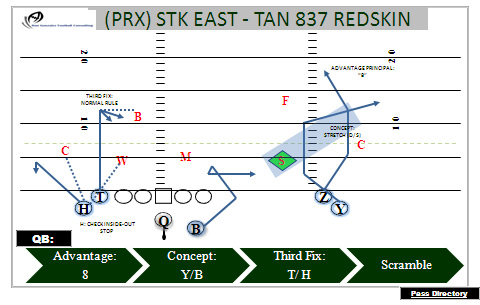
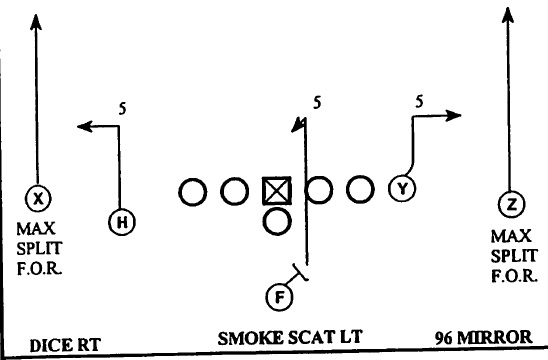
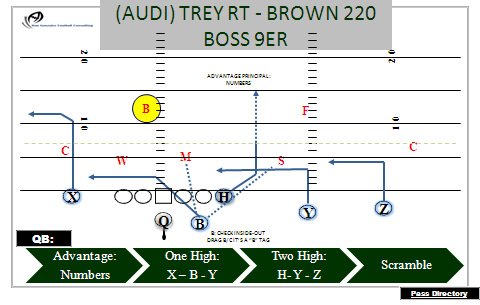
One example of a call to consider would be something like this:
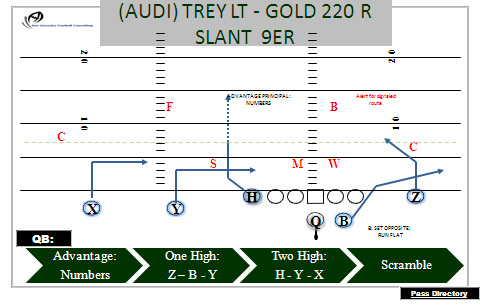
Using the NUMBERS Advantage Principle, we are able to take 2 very basic patterns, and apply them to attack the defense called. If they roll to a single high coverage (including zone blitz), the QB will work the single receiver side. Picture the big play presented as the defense sends a field zone blitz, with B and W rotating to the deep and short holes to the field, and the DE covering the back -- an explosive play to Z!
If the defense elects to play 2 high, we work the multiple receiver side combination, which should feature an easy completion to Y if Mike carries with the H. One should also notice the personnel on the field; on 2nd down, the presence of a TE/ H-back body, could help keep a defense in 4-down base personnel, rather than substituting a 3 down defense.
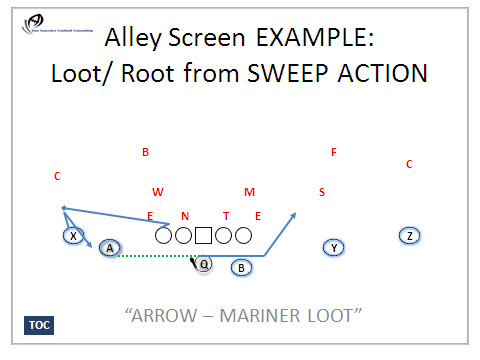
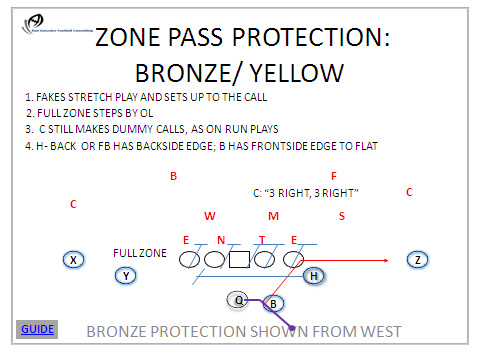
The popularity of "packaged" calls can also fit nicely in this situation. Though not a dropback pass, the action below can will tie in to SCORING ZONE PASS applications:
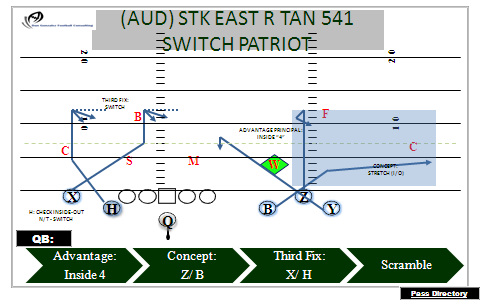
If the defense elects to play 2 high, we work the multiple receiver side combination, which should feature an easy completion to Y if Mike carries with the H. One should also notice the personnel on the field; on 2nd down, the presence of a TE/ H-back body, could help keep a defense in 4-down base personnel, rather than substituting a 3 down defense.
The popularity of "packaged" calls can also fit nicely in this situation. Though not a dropback pass, the action below can will tie in to SCORING ZONE PASS applications:
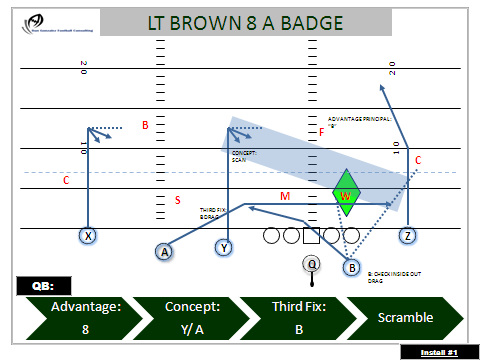
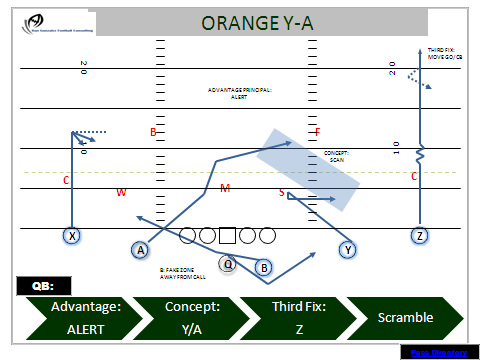
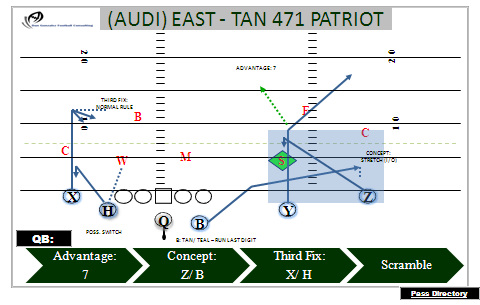
With the underlying theme being one of simplicity for the offense, a Day 1 Installation pass will serve a number of strategic situations. Here, if the Cover 4 defense will have F "cross key" to the Y's vertical release, there is another potential shot to Z. If not, the Z can be put on a "5" (Comeback) and use the Drag as the advantage route (BADGE = Advantage Drag)
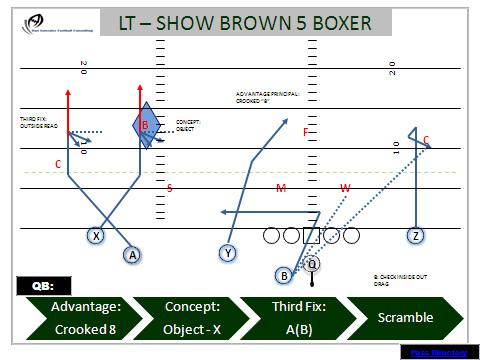
STANDARDIZING COVERAGE is a key factor in 3rd and 6-12, as this is the down and distance where coverage variability will be the greatest. As an offensive coach, the challenge is to create pictures for the passer that are easy to interpret; while many do not think of 2 TE/ H-Back types on the field, a defensive coordinator concerned with personnel match ups would be hard pressed to answer the below with anything but a base defense:
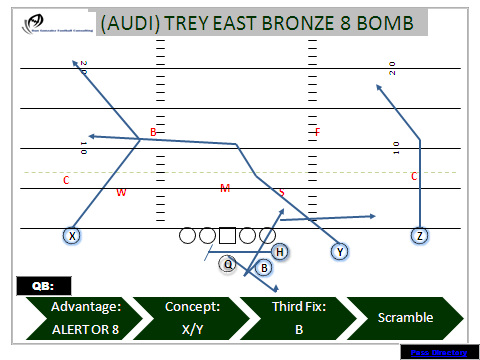
If a base defense is called, the stacked receivers on the right will almost assuredly present some type of BANJO coverage, even if some type of 2 Man is called. Even if the defense did subsitute DBs to go DIME, you will likely still get a good matchup with Mike on B. Remember, Mike is often the last guy substituted. The 3 on 2 on the stack can leave a lot of room for the M to cover one of the offense's best athletes.
While Stack/ Bunch is often thought of as a man to man principle, our teams have come to use it to PREDICT a zone defense - teams will often check to a BANJO or zone principle to avoid getting rubbed off. As a result, we can get softer zone throws than we would against standard width formations.
While Stack/ Bunch is often thought of as a man to man principle, our teams have come to use it to PREDICT a zone defense - teams will often check to a BANJO or zone principle to avoid getting rubbed off. As a result, we can get softer zone throws than we would against standard width formations.
The formation above does three things:
1. It gives a EMPTY look, while still having a 6 man protection (More on EMPTY in the Scoring Zone)
2. The formation system allows to get a bunch alignment AWAY from the TE, so the S and W can both be attacked (Strong LB from standard Bunch)
3. No new assignments for the offense!
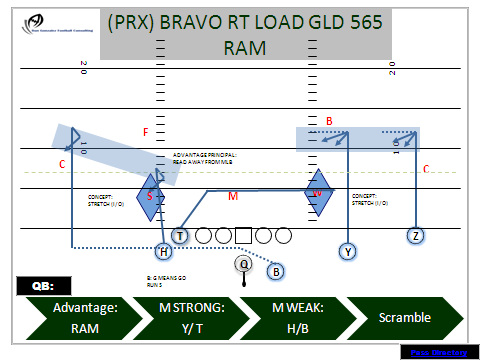
Another thought in regard standardizing coverage is to use the RAM principle once again, throwing opposite the drop of the MLB:
1. It gives a EMPTY look, while still having a 6 man protection (More on EMPTY in the Scoring Zone)
2. The formation system allows to get a bunch alignment AWAY from the TE, so the S and W can both be attacked (Strong LB from standard Bunch)
3. No new assignments for the offense!
Another thought in regard standardizing coverage is to use the RAM principle once again, throwing opposite the drop of the MLB:
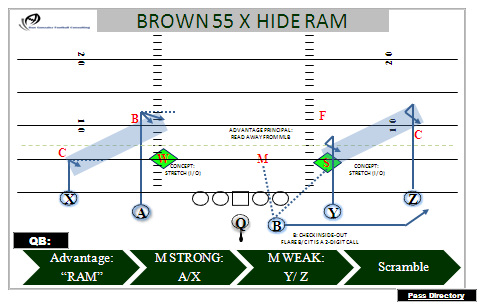
Throwing opposite the MLB's drop provides great possibilities vs. Cover 4, and has been a staple 3rd 7-8 call for years.
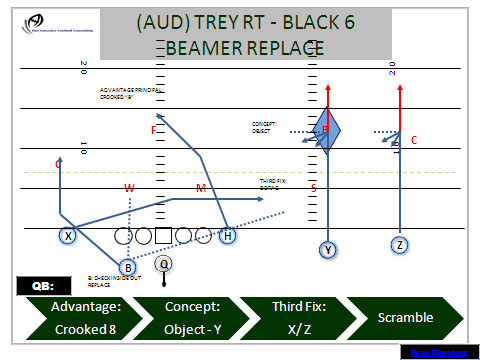
As the yardage needed for the first down gets into the 10 or more range, ZONE BLITZ must be a part of the offensive plan. Naturally, 7 man protections are desireable from certain personnel groups; the ability for the QB (or OC in the booth) to make protection checks is of the utmost importance. Once again, the use of no huddle tempo can be an effective weapon. Picture the possibilities with 4 VERTICALS because the QB is able to re-direct his blockers...
As the yardage needed for the first down gets into the 10 or more range, ZONE BLITZ must be a part of the offensive plan. Naturally, 7 man protections are desireable from certain personnel groups; the ability for the QB (or OC in the booth) to make protection checks is of the utmost importance. Once again, the use of no huddle tempo can be an effective weapon. Picture the possibilities with 4 VERTICALS because the QB is able to re-direct his blockers...
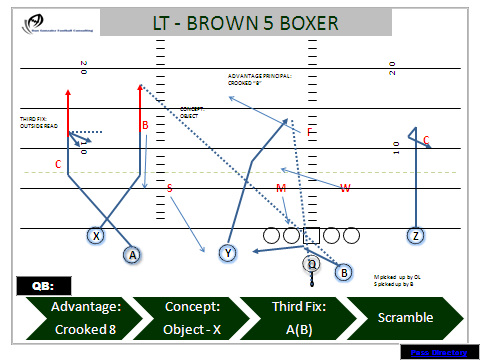
Losing the underneath crosser to protection has been a concern; this concern gave birth to the REPLACE variation. In doing so, the passer has a full compliment of receivers, and gains a RAC possibility versus ZONE BLITZ. In the diagram below, a protection check is made, giving the OL the four down and M linebacker; the RB has the OLBs. This accounts for the "4 to a side" problem of zone blitz. Once again, without having to throw "hot," the defense is vulnerable in the seams.
 RSS Feed
